Your Quick Guide to Connext
Whether you're building a pergola, gazebo, barn, or front entrance, Connext makes the process easier while delivering unmatched quality and durability. Here's your step-by-step guide to building smarter with Connext:
1. Plan
Start with a clear design plan and know your timber specifications. Build your connector list from our website, where you'll find post-to-beam, post-to-base, diagonal, and multi-beam connectors.
Tip: Check your timber size carefully—is it rough-sawn (nominal) or finished (actual)? Select the connector size that matches your timber's actual dimensions.
Want to save time? Use our pre-existing Plans for ready-to-build gazebos, pergolas, barns, and more. Best of all, these plans include a detailed connector list.
The Lakeville Carport from Connext
2. Prep Your Timber
Once you have your timber and connectors, it’s time to prepare your wood. Connext requires a .25" slot in the wood end grain (except for 3.5” x 3.5” connectors, which require a .2” slot).
Slot Depth:
2.63” for 3.5” connectors
4.52” for 5.5” and 6” connectors.
5.43” for 7.5”, 8”, 10” and 12” connectors.
Refer to our product diagrams for detailed drawings and specifications.
Connext is designed to work with most standard chainsaws. Ensure that you use a chain with a 3/8” pitch and .050 gauge for the best results.
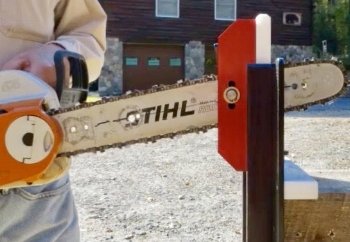
For speed and accuracy, Connext Slotting Tools are available to ensure precision cuts.
Pro Slotter from Connext
3. Chamfer the Slot Edges
Chamfering the slot edges ensures a precise fit where the connector fin meets the base plate. Connext beams are made from 6061 structural aluminum, a high-strength material formed through extrusion. The extrusion process creates slightly rounded intersections between the fin and base plate to maximize strength.
Routing the slot edges ensures the connector fits seamlessly into the beam, maintaining proper alignment and integrity.
For consistent, precise results, use our Router Plate with a Whiteside 1984 Roundover Bit (⅜ radius). Click here to learn more.
Chamfer slot with a Router Plate from Connext.
4. Create Pin Holes
Choose your preferred method for creating precise pin holes once the connector is inserted into the slot.
Tip: Using a Drill Jig is highly recommended. Create your own from our product diagrams, or use our Drill Jigs for maximum precision and stability.
Method 1: Drill into the wood to mark the aluminum, then remove the connector. Finish drilling through the connector in the field or with a drill press.
Method 2: Drill directly through both the wood and aluminum. Work slowly and clear out shavings frequently to avoid overheating the bushings.
Method 3: Drill through the wood first, set the timber, and then drill through the aluminum using the existing holes after ensuring the timber is level and plumb.
Precision Drill Jigs from Connext
5. Secure Your Connection
Position your connector and secure it using the included GRK RSS screws (for wood) or GRK Caliburn Concrete Screws (for concrete). For concrete, we recommend using a ¼” x 5½” concrete drill bit to set your screws to base.
Place your timber and hammer in the chamfered pins to lock everything in place.
The examples below show basic connections, but Connext also offers multi-beam and diagonal connectors to meet more complex project needs.
6. Admire Your Work
Step back and appreciate the result: a strong, durable connection that’s both functional and visually stunning.
Tips to Elevate Your Build
Watch the Videos: Explore our YouTube channel for instructional videos and tips.
Choose the Right Chainsaw: Achieving clean and precise slots is crucial for a perfect fit with our connectors. These chainsaws are proven to deliver (3/8” pitch and .050 gauge required):
Stihl MS250
Stihl 9RXDL (72 links)
Makita UC405
Oregon (18" bar length, Low Profile)
Touch-Up Pins: After hammering, cover scratches on pins with a Rust-Oleum 222644 paint pen for a polished finish.
Square Your Timber: Use a SkillSaw SawSquatch Carpentry Chainsaw for clean, square cuts on large timbers.
Clean Your Slots: After slotting, run a 12” square through the cut to remove debris, especially in rough-sawn timber that may hold moisture.
Protect Your Tools: Avoid overheating drill jig bushings, as excessive heat can melt the HDPE.
Add Lift: Elevate your posts with a 1” HDPE Riser for added height and moisture protection. Recess standard connectors into 10” x 10” or 12” x 12” risers for large beams.


